Tuesday, December 30, 2014

Finding Your Parallel Port Address for PCI Card


If you are unable to find a computer with a parallel port to control your Industrial CNC Router and decide to install a new PCI card, you may have trouble getting Mach to communicate with the machine. First of all you want to make sure that your card is putting out a 5V signal, as some models put out lower voltage which won't work. Of course you want to make sure you follow the manufacturers instructions, including installing the appropriate driver.

You'll also want to make sure that you have Mach 3 set to find your new card. If you open Mach and Look in Config/Ports and Pins. By default Mach will assign 0x378, which is where a native parallel port would be.


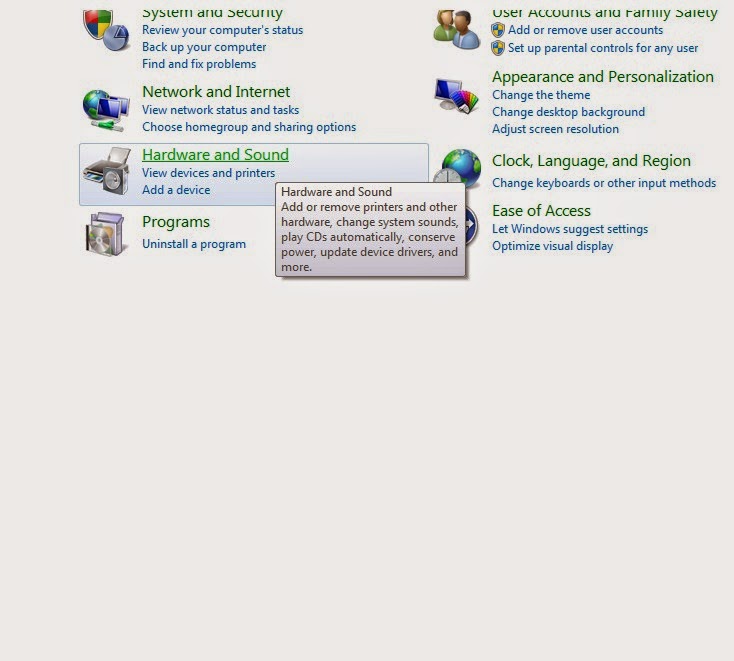
 A new card is not likely to have this address, so you'll have to find out what it is.  You can find it by going to your Windows Control Panel. Clack on "Hardware and Sound"  and you should see an option for "Device Manager" Clicking on this will give you a list of your devices, including your PCI Card. Right Click on the PCI Card in the list and choose "Properties" you should see your I/O Range. Select the first four characters and enter them into Mach 3 as your port address with 0x added in front of them. Mach should now be communicate with your new PCI card.

Control panel/Hardware and Sound

Devices and Printers/Device Manager


Device Manager/PCI Parallel Port/Properties


In this case. your address would be 0xDCC8. 
Enter it into Mach 3 Config/Ports and Pins/Port Setup and Axis Selection.


Controlling your Industrial CNC Router with Newer Computer Systems

The Mach 3 software that you're using to control your Industrial CNC Router requires a 32 bit desktop version of Windows and a Native parallel port. Because these systems are getting harder to find we've done some testing with different solutions. 


If you'd like to control your machine with a laptop, a 64 bit version of windows, or a PC without a 25 pin parallel port, you'll need an external motion controller. The best solution we've found is the SSENC-2 Ethernet SmoothStepper System from Soigeneris.


We've done extensive testing on different Windows systems and it gives consistent results every time. Unlike many external motion controls, this is a plug and play solution. The SSENC-2 is plugged into the Router via parallel port, and then connects to your computer via ethernet port (USB is also available.) Since it has it's own power supply it can even be plugged into a laptop.


They provide easy to follow step by step instructions to get you going quickly.

Take a look here:


http://www.soigeneris.com/ssenc_2_ethernet_smoothstepper_system-details.aspx

Wednesday, September 24, 2014

Engraving Bits

I've been getting a lot of questions lately about engraving bits, so here are a few recommendations.

For engraving steel, glass, granite and other materials, the diamond drag engraving bit is a dependable choice due to its spring loaded floating head which keeps the pressure constant on your surface. And of course, the diamond tip can cut cleanly into most materials.


If you don't need the spring loaded pressure or the diamond cutter, The In-Groove engraving system is popular and dependable. It uses blade inserts which can be sharpened, and easily replaced when you finally wear them out. There are many different inserts available, which means you can buy an insert for different angles and materials rather than a whole new bit.


And of course you can also buy them individually from nearly any supplier, just make sure you get the right shank size for your collett, and that you have the right angle for your job.


Tuesday, March 11, 2014

Loading Gcode in Mach 3

1) In the Mach 3 Software, click "Load GCode" (Or go to the the top of the screen, select, "File" and then "Load GCode"

2) Select the gcode file you'll be using.

3) Using your computer key board, jog (move) the spindle to the starting position (zero position) for your job. I suggest using the bottom left corner of your material. Bring the spindle down to touch the surface of the material you'll be cutting.

4) When spindle is at the zero or home position, Click the three Zero Buttons to the Left of your X, Y, and Z coordinate, making sure that all 3 read "0"


5) Hit the "Cycle Start" Button.Your spindle will pick up and start cutting the job