If you are unable to find a computer with a parallel port to control your Industrial CNC Router and decide to install a new PCI card, you may have trouble getting Mach to communicate with the machine. First of all you want to make sure that your card is putting out a 5V signal, as some models put out lower voltage which won't work. Of course you want to make sure you follow the manufacturers instructions, including installing the appropriate driver.
You'll also want to make sure that you have Mach 3 set to find your new card. If you open Mach and Look in Config/Ports and Pins. By default Mach will assign 0x378, which is where a native parallel port would be.
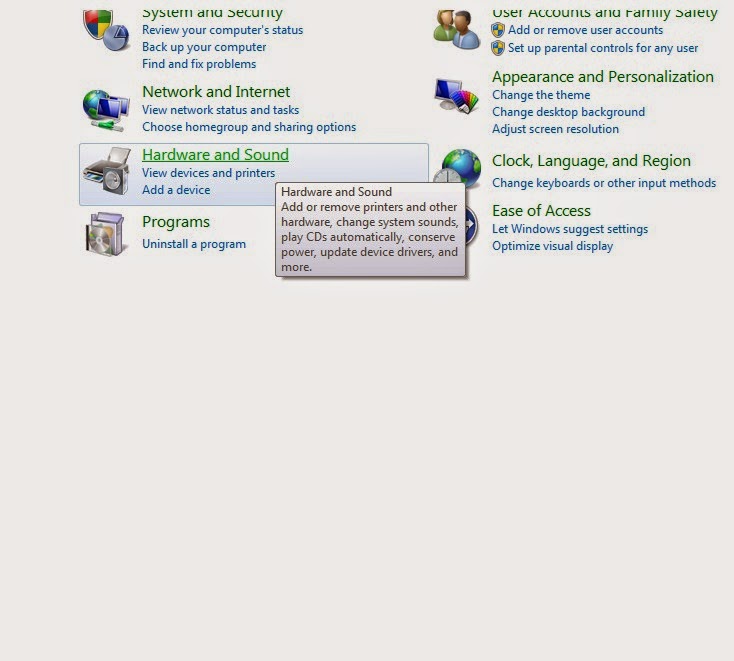
A new card is not likely to have this address, so you'll have to find out what it is. You can find it by going to your Windows Control Panel. Clack on "Hardware and Sound" and you should see an option for "Device Manager" Clicking on this will give you a list of your devices, including your PCI Card. Right Click on the PCI Card in the list and choose "Properties" you should see your I/O Range. Select the first four characters and enter them into Mach 3 as your port address with 0x added in front of them. Mach should now be communicate with your new PCI card.
Control panel/Hardware and Sound
Devices and Printers/Device Manager
Device Manager/PCI Parallel Port/Properties
In this case. your address would be 0xDCC8.
Enter it into Mach 3 Config/Ports and Pins/Port Setup and Axis Selection.
The Mach 3 software that you're using to control your Industrial CNC Router requires a 32 bit desktop version of Windows and a Native parallel port. Because these systems are getting harder to find we've done some testing with different solutions.
If you'd like to control your machine with a laptop, a 64 bit version of windows, or a PC without a 25 pin parallel port, you'll need an external motion controller. The best solution we've found is the SSENC-2 Ethernet SmoothStepper System from Soigeneris.
We've done extensive testing on different Windows systems and it gives consistent results every time. Unlike many external motion controls, this is a plug and play solution. The SSENC-2 is plugged into the Router via parallel port, and then connects to your computer via ethernet port (USB is also available.) Since it has it's own power supply it can even be plugged into a laptop.
They provide easy to follow step by step instructions to get you going quickly.
I've been getting a lot of questions lately about engraving bits, so here are a few recommendations.
For engraving steel, glass, granite and other materials, the diamond drag engraving bit is a dependable choice due to its spring loaded floating head which keeps the pressure constant on your surface. And of course, the diamond tip can cut cleanly into most materials.
If you don't need the spring loaded pressure or the diamond cutter, The In-Groove engraving system is popular and dependable. It uses blade inserts which can be sharpened, and easily replaced when you finally wear them out. There are many different inserts available, which means you can buy an insert for different angles and materials rather than a whole new bit.
And of course you can also buy them individually from nearly any supplier, just make sure you get the right shank size for your collett, and that you have the right angle for your job.
1) In the Mach 3 Software, click "Load GCode" (Or go to the the top of the screen, select, "File" and then "Load GCode"
2) Select the gcode file you'll be using.
3) Using your computer key board, jog (move) the spindle to the starting position (zero position) for your job. I suggest using the bottom left corner of your material. Bring the spindle down to touch the surface of the material you'll be cutting.
4) When spindle is at the zero or home position, Click the three Zero Buttons to the Left of your X, Y, and Z coordinate, making sure that all 3 read "0"
5) Hit the "Cycle Start" Button.Your spindle will pick up and start cutting the job
Many of our customers are cutting or planning to cut Acrylic with their Industrial CNC Router. You can get a smooth finish when cutting this material, however as with most plastics, you do have to pay attention to a few factors, as it requires a little more care than cutting wood. Here are the most important factors to getting a clean cut:
1) Hold Down.
Make sure that the acrylic is held down securely. If it's not it can vibrate or flex ruining your cut altogether or marring the finish. On a T-Slot tabletop,with a sacrificial board, a few strips of double sided tape on the back side will go a long way to secure the piece. If you prefer, you can also use spray adhesives. Just make sure that the chemical properties are suitable for acrylic. A Vacuum Hold Table can make things easier, but if you're cutting pieces with a small surface area you may want to take these precautions as well.
2) Bits
When cutting Acrylic, you won't get the best result using wood cutting bits, as cutting and chip removal are much more important. We recommend using a bit designed for Acrylic cutting. Our customers typically get the best results using "O-Flute" End Mill Bits.
While you can use bits of all sizes, it's generally advisable to use the largest bit possible for your design, as this increases depth possible, stability and removal of waste material.
Make sure that your bits stay sharp, as a dull bit will not give you the edges you want.
3)Feedrate
Ideal feedrate for cutting Acrylic is typically 75-300 IPM, depending on the size of your bit. For example, an 1/8" bit work better on the low end (75-100) while a 1/2" bit would work well at 200-300. This is for the sake of the bit as much as the material.
4)RPM
Recommended spindle speed for cutting Acrylic is at least 18,000 RPM. You can possibly use higher RPM's, but you may need to adjust your feedrate (faster) as well to prevent the material melting. Use these speeds as a starting point and as you bump up your feed rate and RPM, keep track of results for the best combinations.
5) Cut Depth
Aim for about twice the diameter of the bit for a uniform cut. This is also a good practice to prevent breaking your bit.
6) Ramping
In your Post Processor Program make sure to have the machine Ramp to starting point, rather than plunge straight down. This is much smoother and prevents any distortion on breaking the material surface.
Once you have your Industrial CNC Router running, you're ready to start thinking about your router bits. The Industrial CNC Machines use an ER-20 Spring collett (unless you have an Auto ToolChanger in which case you'll use BT-30's)
These collett's are available in a variety of Imperial and Metric sizes, which you'll match up with the shank of the bits you're using. If you're using a 1/4" collett, you'll need bits with a 1/4" shank.
For cutting, you'll most likely be using End Mill bits. They're similar in design to drill bits, except the have blades on the side to allow for horizontal cutting, rather than simply plunging up and down. The two parts of the bit are the shank and the cutting area. Insert the shank only into the collett leaving the cutting area exposed. For ideal results you'll want to use the shortest bit possible for the job as the longer it is the more tension is taken up by the bit and the more likely it is to snap.
There are many varieties of bits available, and specialized bits for any material you'll be cutting. For long bit life and the best cutting, you may want to consider some good carbide bits. In a pinch, the bits at your local Home Depot will work, but they won't last as long or cut as cleanly.
You'll find that there are many types of end mills available. The two main types are upcut and downcut. The upcut pulls waste out of the cut, while the downcut does the opposite. The downcut type leaves the top surface cleaner, while the downcut leaves the bottom cleaner. It should also be noted that the upcut endmill bit pulls up on your material so it's more important to have it held down securely.
For cutting wood, either can work, but for plastics and other materials you may want to go with an upcut to prevent wasted from melting into the path it left. There are also different flute patterns (single, double, etc.) which are useful for better cleanup and finishes.
A straight end mill bit is useful for most cutting, but if you're planning to do any relief or 3D work, you can also consider a ball nose endmill bit. This is simply an endmill with a rounded tip, producing a smoother finish than the flat tip of the traditional endmill.
For finer detail, there are also engraving bits, which taper down to a point at the end, using different angles. These are great for text and very fine detail work, but keep in mind they're not designed for lots of straight cutting like end mill bits and they'll break easily if you ask too much of them.
Also popular is the V-Bit, which allows you to create a beveled effect of the edges of your cut without having to build it into your design. These are very useful for lettering and for borders.
You may also want to fave a fly cutting/planing bit on hand if you have a lot of surfacing planned. This bit has a flat bottom designed for skimming the surface of your material. You can get them in very wide diameters, cutting down your work time, but again, it is not an endmill bit, and not for deep cutting.
Those are the basics. Of course there are many other specialty bits available, such as drag knife bit to allow your CNC to work like a vinyl plotter.
Here are some starting tips to help you get going (mostly for endmill bits)
1) Start out cutting the same depth as the diameter of your bit. (quarter in diameter, quarter inch deep.) As you get more comfortable, try cutting a little deeper. You should never cut more than 4x the diameter of your bit.
2) Make sure that you take the exposed length of your bit into account when cutting. For example, if your bit extends 2 inches from the collett, you cannot cut 2.5 inches deep.
3) Tighten the cap over the collett, after the bit is inserted. Make sure the collett is flush with the bottom of the cap.
4) Your bit should spin straight. If you see it wobbling when you turn on your spindle, it is not inserted correctly.
5) Consult your bit supplier's charts for recommended feedrate/RPM for diferent materials. Wood, Acrylic, Aluminum and other materials all have their own needs for ideal cuts.
6) Use the shorteset bit possible for the cut to decrease possible deflection.
7) Use the largest diameter bit possible to cut deeper and reduce work time.
8) Keep your bits clean after use to extend tool life.